One Week With KDE Plasma Workspaces 6 on Fedora 40 Beta (Vol. 2)

Checking In

It’s been a few days since my first entry in this series. For the most part, things have been going quite smoothly. I have to say, I am liking KDE Plasma Workspaces 6 much better than previous releases (which I dabbled with but admittedly did not spend a significant amount of time using). The majority of what I want to do here Just Works. This should probably not come as a surprise to me, but I’ve been burned before when jumping desktops.

I suppose that should really be my first distinct note here: the transition from GNOME Desktop to KDE Plasma Workspaces has been minimally painful. No matter what, there will always be some degree of muscle memory that needs to be relearned when changing working environments. It’s as true going from GNOME to KDE as it is from Windows to Mac, Mac to ChromeOS and any other major shift. That said, the Fedora Change that prompted this investigation is specifically about the possibility of changing the desktop environment of Fedora Workstation over to using KDE Plasma Workspaces and away from GNOME. As such, I will be keeping in mind some of the larger differences that users would face in such a transition.

Getting fully hooked up

The first few days of this experience, I spent all of my time directly at my laptop, rather than at my usual monitor-and-keyboard setup. This was because I didn’t want to taint my initial experience with potential hardware-specific headaches. My main setup involves a very large 21:9 aspect monitor, an HDMI surround sound receiver and a USB stereo/mic headset connected via a temperamental USB 3.2/Thunderbolt hub and the cheapest USB A/B switch imaginable (I share these peripherals with an overpowered gaming PC). So when I put aside my usual daily driver and plugged my Thinkpad into the USB-C hub, I was prepared for the worst. At the best of times, Fedora has been… touchy about working with these devices.

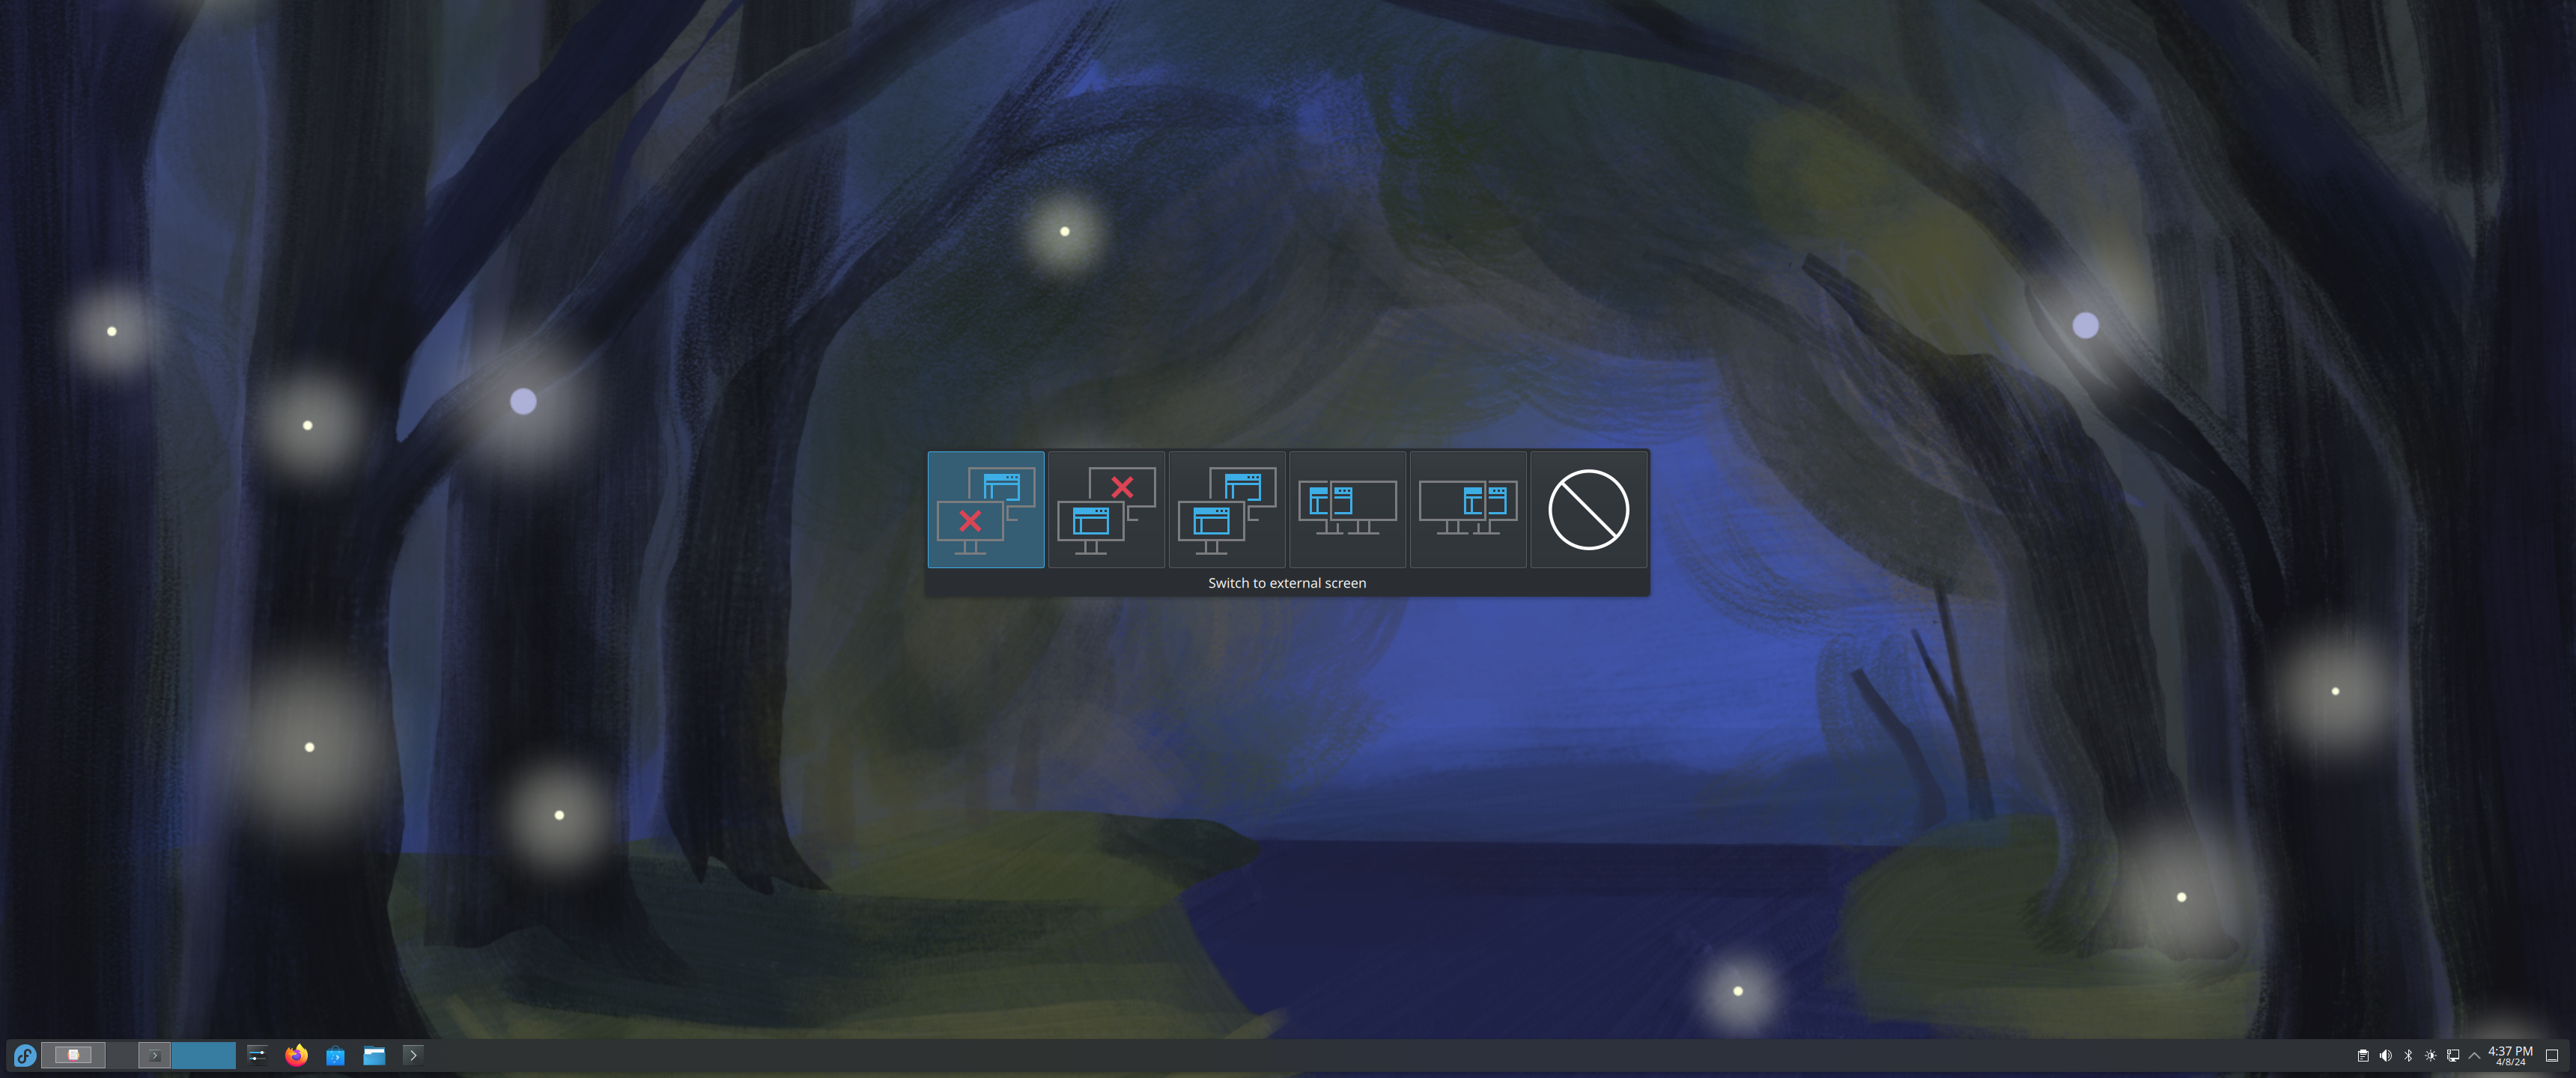
Let’s start with the good bits: When I first connected the laptop to my docking station, I was immediately greeted by an on-screen display asking me how I wanted to handle the new monitor. Rather than just making a guess between cloning or spanning the desktop, it gave me an easy and visual prompt to do so. Unfortunately, I don’t have a screenshot of this, as after the first time it seems that the system “remembers” the devices and puts them back the way I had them. This is absolutely desirable for the user, but as a reviewer it makes it harder to show it off. (EDIT: After initial publication, I was informed of the meta-P shortcut which allowed me to grab this screenshot)

Something else that I liked about the multi-monitor support was the way that the virtual desktop space on the taskbar automatically expanded to include the contents from both screens. It’s a simple thing, but I found that it made it really easy to tell at a glance which desktop I had particular applications running on.

All in all, I want to be clear here: the majority of my experience with KDE Plasma Workspaces has been absolutely fine. So many things work the same (or close enough) to how they work in GNOME that the transition has actually been much easier than I expected. the biggest workflow changes I’ve encountered are related to keyboard shortcuts, but I’m not going to belabor that, having discussed it in the first entry. The one additional keyboard-shortcut complaint I will make is this: using the “meta” key and typing an application name has a strange behavior that gets in my way. It almost behaves identically to GNOME; I tap “meta” and start typing and then hit enter to proceed. But the issue I have with KDE is this: I’m a fast typist and the KDE prompt doesn’t accept <enter> until the visual effect of opening the menu completes. This baffles me, as it accepts all of the other keys. So my muscle memory to launch a terminal by quickly tapping “meta”, typing “term” and hitting enter doesn’t actually launch the terminal. It leaves me at the menu with konsole sitting there. When I hit enter after the animation completes, it works fine. So while the behavior isn’t wrong, per se, it’s frustrating. The fact that it accepts the other characters makes me think this was a deliberate choice that I don’t understand.

There have been a few other issues, mostly around hardware support. I want to be clear: I’m fully aware that hardware is hard. One issue in particular that has gotten in the way is support for USB and HDMI sound devices in KDE Plasma. I don’t know if it’s specifically my esoteric hardware or a more general problem, but it has been very hard to get KDE to use the correct inputs and outputs. In the case of the HDMI audio receiver, I still haven’t been able to get KDE to present it as an output option in the control panel. It connects to the receiver and treats it as a very basic 720p video output device, but it just won’t recognize it as an audio output device. My USB stereo headset with mic has also been more headache than headset: after much trial and error, I’ve managed to identify the right output to send stereo output to it, but no matter what I have fiddled with, it does not recognize the microphone.

More issues on the hardware front are related to having two webcam devices available. KDE properly detects both the built-in camera on the laptop as well as the external webcam I have clipped to the top of my main monitor, but it seems to have difficulty switching between them. I’m not yet 100% sure how much of this is a KDE problem and how much a Firefox problem, but it is frustrating. Sometimes I’ll select my external webcam and it will still be taking input from the built-in camera. Also, it seems to always show two entries for both devices. I need to do more digging here, but I anticipate that I’ll be filing a bug report once I gather enough data.

Odds and Ends

I have mixed feelings about KDE’s clipboard applet in the toolbar. On the one hand, I can certainly see the convenience of digging into the clipboard history, particularly if you accidentally drag-select something and replace the clipboard copy you intended to keep. On the other hand, as a heavy user of Bitwarden who regularly copies passwords1 out of the wallet and into other applications, the fact that all of the clipboard contents are easily viewable in plaintext to anyone walking by if I forget to lock my screen for a few seconds is quite alarming. I’m pretty sure I’ll either have to disable this applet or build a habit of clearing it any time I copy a password. Probably the former, as I don’t like the fact that I have to call up and make the plaintext visible first in order to delete it without clearing the entire history anyway.

Conclusion

This will probably seem odd after a post that mostly contained complaints and nitpicks, but I want to reiterate: my experience over the last several days has actually been quite good. When dealing with a computer, I consider “it was boring” to be the highest of praise. Using KDE has not been a life-altering experience. It has been a stable, comfortable environment in which to get work done. Have I experienced some issues? Absolutely. None of them are deal-breakers, though the audio issues are fairly annoying. My time in the Fedora Project has shown me that hardware issues inevitably get fixed once they are noticed, so I’m not overly worried.

As for me? I’m going to stick around in KDE for a while and see how things play out. If you’re reading this and you’re curious, I’ll happily direct you to the Fedora KDE Spin for the Live ISO or the Kinoite installer if, like me, you enjoy an atomic update environment. Make sure to select “Show Beta downloads” to get Plasma 6!

  1. I generate high-entropy, unique random passwords for everything. Don’t you? ↩︎

One Week With KDE Plasma Workspaces 6 on Fedora 40 Beta (Vol. 1)

Why am I doing this?

As my readers may be aware, I have been a member of the Fedora Engineering Steering Committee (FESCo) for over a decade. One of the primary responsibilities of this nine-person body is to review the Fedora Change Proposals submitted by contributors and provide feedback as well as being the final authority as to whether those Changes will go forth. I take this responsibility very seriously, so when this week the Fedora KDE community brought forth a Change Proposal to replace GNOME Desktop with KDE Plasma Workspaces as the official desktop environment in the Fedora Workstation Edition, I decided that I would be remiss in my duties if I didn’t spend some serious time considering the decision.

As long-time readers of this blog may recall, I was a user of the KDE desktop environment for many years, right up until KDE 4.0 arrived. At that time, (partly because I had recently become employed by Red Hat), I opted to switch to GNOME 2. I’ve subsequently continued to stay with GNOME, even through some of its rougher years, partly through inertia and partly out of a self-imposed responsibility to always be running the Fedora/Red Hat premier offering so that I could help catch and fix issues before they got into users’ and customers’ hands. Among other things, this led to my (fairly well-received) series of blog posts on GNOME 3 Classic. As it has now been over ten years and twenty(!) Fedora releases, I felt like it was time to give KDE Plasma Workspaces another chance with the release of the highly-awaited version 6.0.

How will I do this?

I’ve committed to spending at least a week using KDE Plasma Workspaces 6 as my sole working environment. This afternoon, I downloaded the latest Fedora Kinoite installer image and wrote it to a USB drive.1 I pulled out a ThinkPad I had lying around and went ahead with the install process. I’ll describe my setup process a bit below, but (spoiler alert) it went smoothly and I am typing up this blog entry from within KDE Plasma.

What does my setup look like?

I’m working from a Red Hat-issued ThinkPad T490s, a four-core Intel “Whiskey Lake” x86_64 system with 32 GiB of RAM and embedded Intel UHD 620 graphics. Not a powerhouse by any means, but only about three or four years old. I’ve wiped the system completely and done a fresh install rather than install the KDE packages by hand onto my usual Fedora Workstation system. This is partly to ensure that I get a pristine environment for this experimen and partly so I don’t worry about breaking my existing system.

Thoughts on the install process

I have very little to say about the install process. It was functionally identical to installing Fedora Silverblue, with the minimalist Anaconda environment providing me some basic choices around storage (I just wiped the disk and told it to repartition it however it recommends) and networking (I picked a pithy hostname: kuriosity). That done, I hit the “install” button, rebooted and here we are.

First login

Upon logging in, I was met with the KDE Welcome Center (Hi Konqi!), which I opted to proceed through very thoroughly, hoping that it would provide me enough information to get moving ahead. I have a few nitpicks here:

First, the second page of the Welcome Center (the first with content beyond “this is KDE and Fedora”) was very sparse, saying basically “KDE is simple and usable out of the box!” and then using up MOST of its available screen real estate with a giant button directing users to the Settings app. I am not sure what the goal is here: it’s not super-obvious that it is a button, but if you click on it, you launch an app that is about as far from “welcoming” as you can get (more on that later). I think it might be better to just have a little video or image here that just points at the settings app on the taskbar rather than providing an immediate launcher. It both disrupts the “Welcome” workflow and can make less-technical users feel like they may be in over their heads.

I actually think the next page is a much better difficulty ramp; it presents some advanced topics that they might be interested in, but it doesn’t look quite as demanding of them and it doesn’t completely take the user out of the workflow.

Next up on the Welcome Center was something very welcome: an introduction to Discover (the “app store”). I very much like this (and other desktop environments could absolutely learn from it). It immediately provides the user with an opportunity to install some very popular add-ons.2

The next page was a bit of a mixed bag for me. I like that the user is given the option to opt-in to sharing anonymous user information, but I feel like the slider and the associated details it provided are probably a bit too much for most users to reasonably parse. I think this can probably be simplified to make it more approachable (or at least bury the extra details behind a button; I had to extend the window from its default size to get a screenshot).

At the end of the Welcome Center was a page that gave me pause: a request for donations to the KDE project. I’m not sure this is a great place for it, since the user hasn’t even spent any time with the environment at all yet. It seems a bit too forwards with asking for donations. I’m not sure where a better place is, but getting begged for spare change minutes after installing the OS doesn’t feel right. I think that if we were to make KDE the flagship desktop behind Fedora Workstation, this would absolutely have to come out. I think it gives a bad first impression. I think a far better place to leave things would be the preceding page:

OK, so let’s use it a bit!

With that out of the way, I proceeded to do a bit of setup for personal preferences. I installed my preferred shell (zsh) and some assorted CLI customizations for the shell, vi, git, etc. This was identical to the process I would have followed for Silverblue/GNOME, so I won’t go into any details here. I also have a preference for touchpad scrolling to move the page (like I’m swiping a touch-screen), so I set that as well. I was confused for a bit as it seemed that wasn’t having an effect, but I realized I had missed that “touchpad” was a separate settings page from “mouse” and had flipped the switch on the wrong devices. Whoops!

In the process of setting things up to my liking, I did notice one more potential hurdle for newcomers: the default keyboard shortcuts for working with desktop workspaces are different from GNOME, MacOS and Windows 11. No matter which major competitor you are coming from, this will cause muscle-memory stumbles. It’s not that any one approach is better than another, but the fact that they are all completely different makes me sigh and forces me to think about how I’m interacting with the system instead of what I want to do with it. Unfortunately, KDE did not make figuring this out easy on me; even when I used the excellent desktop search feature to find the keyboard shortcut settings, I was presented by a list of applications that did not clearly identify which one might contain the system-wide shortcuts. By virtue of past experience with KDE, I was able to surmise that the KWin application was the most likely place, but the settings app really didn’t seem to want to help me figure that out. Then, when I selected KWin, I was presented with dozens of pages of potential shortcuts, many of which were named similarly to the ones I wanted to identify. This was simply too many options with no clear way to sort them. I ended up resorting to trying random combinations of ctrl, alt, meta and shift with arrow keys until I eventually stumbled upon the correct set.

Next, I played around a bit with Discover, installing a pending firmware update for my laptop (which hadn’t been turned on in months). I also enabled Flathub and installed Visual Studio Code to see how well Flatpak integration works and also for an app that I know doesn’t natively use Wayland. That was how I discovered that my system had defaulted to a 125% fractional scaling setup. In Visual Studio Code, everything looked very slightly “off” compared to the rest of the system. Not in any way I could easily put my finger to, until I remembered how badly fractional scaling behaved on my GNOME system. I looked into the display settings and, sure enough, I wasn’t at an integer scaling value. Out of curiosity, I played around with the toggle for whether to have X11 apps scale themselves or for the system to do it and found that the default “Apply scaling themselves” was FAR better looking in Visual Studio Code. At the end of the day, however, I decided that I preferred the smaller text and larger available working area afforded me by setting the scaling back to 100%. That said, if my eyesight was poorer or I needed to sit further away from the screen, I can definitely see the advantages to the fractional scaling and I was very impressed by how sharp it managed to be. Full marks on that one!

I next went to play around in Visual Studio Code with one of my projects, but when I tried to git clone it, I hit an issue where it refused my SSH key. Digging in, I realized that KDE does not automatically check for keys in the default user location (~/.ssh) and prompt for their passphrases. I went ahead and used ssh-add to manually import them into the SSH keyring and moved along. I find myself going back and forth on this; on the one hand, there’s a definite security tradeoff inherent in allowing the desktop to prompt (and offer to save) the passphrase in the desktop keyring (encrypted by your login password). I decline to save mine persistently, preferring to enter it each time. However, there’s a usability tradeoff to not automatically at least launching an askpass prompt. In any case, it’s not really an issue for me to make this part of my usual toolbox entry process, but I’m a technical user. Newbies might be a bit confused if they’re coming from another environment.

I then went through the motions of getting myself signed in to the various messaging services that I use on a daily basis, including Fedora’s Matrix. Once signed in there via Firefox, I was prompted to enable notifications, which I did. I then discovered the first truly sublime moment I’ve had with Plasma Workspaces: the ephemeral notifications provided by the desktop. The way they present themselves, off to the side and with a vibrant preview window and show you a progress countdown until they vanish is just *chef’s kiss*. If I take nothing else away from this experience, it’s that it is possible for desktop notifications to be beautiful. Other desktops need to take note here.

I think this is where I’m going to leave things for today, so I’ll end with a short summary: As a desktop environment, it seems to do just about everything I need it to do. It’s customizable to the point of fault: it’s got so many knobs to twist that it desperately needs a map (or perhaps a beginner vs. expert view of the settings app). Also, the desktop notifications are like a glass of icy lemonade after two days lost in the desert.

  1. This was actually my first hiccough: I have dozens of 4 GiB thumbdrives lying around, but the Kinoite installer was 4.2 GiB, so I had to go buy a new drive. I’m not going to ding KDE for my lack of preparedness, though! ↩︎
  2. Unfortunately I hit a bug here; it turns out that all of those app buttons will just link to the updates page in Discover if there is an update waiting. I’m not sure if this is specific to Kinoite yet. I’ll be investigating and filing a ticket about it in the appropriate place. ↩︎

Sausage Factory: Fedora ELN Rebuild Strategy

The Rebuild Algorithm (2023 Edition)

Slow and Steady Wins the Race

The Fedora ELN SIG maintains a tool called ELNBuildSync1 (or EBS) which is responsible for monitoring traffic on the Fedora Messaging Bus and listening for Koji tagging events. When a package is tagged into Rawhide (meaning it has passed Fedora QA Gating and is headed to the official repositories), EBS checks whether it’s on the list of packages targeted for Fedora ELN or ELN Extras and enqueues it for the next batch of builds.

A batch begins when there are one or more enqueued builds and at least five wallclock seconds have passed since a build has been enqueued. This allows EBS to capture events such as a complete side-tag being merged into Rawhide at once; it will always rebuild those together in a batch. Once a batch begins, all other messages are enqueued for the following batch. When the current batch is complete, a new batch will begin.

The first thing that is done when processing a batch is to create a new side-tag derived from the ELN buildroot. Into this new target, EBS will tag most of the Rawhide builds. It will then wait until Koji has regenerated the buildroot for the batch tag before triggering the rebuild of the batched packages. This strategy avoids most of the ordering issues (particularly bootstrap loops) inherent in rebuilding a side-tag, because we can rely on the Rawhide builds having already succeeded.

Once the rebuild is ready to begin, EBS interrogates Koji for the original git commit used to build each Rawhide package (in case git has seen subsequent, unbuilt changes). The builds are then triggered in the side tag concurrently. EBS monitors these builds for completion. If one or more builds in a batch fails, EBS will re-queue it for another rebuild attempt. This repeats until the same set of failures occurs twice in a row. Once all of the rebuild attempts have concluded, EBS tags all successful builds back to ELN and removes the side tag. Then it moves on to preparing another batch, if there are packages waiting.

History

In its first incarnation, ELNBuildSync (at the time known as DistroBuildSync) was very simplistic. It listened for tag events on Rawhide, checked them against its list and then triggered a build in the ELN target. Very quickly, the ELN SIG realized that this had significant limitations, particularly in the case of packages building in side-tags (which was becoming more common as the era of on-demand side-tags began). One of the main benefits of side-tags is the ability to rebuild packages that depend on one another in the proper order; this was lost in the BuildSync process and many times builds were happening out of order, resulting in packages with the same NVR as Rawhide but incorrectly built against older versions of their dependencies.

Initially, the ELN SIG tried to design a way to exactly mirror the build process in the side-tags, but that resulted in its own new set of problems. First of all, it would be very slow; the only way to guarantee that side-tags are built against the same version of their dependencies as the Rawhide version would be to perform all of those builds serially. Secondly, even determining the order of operations in a side-tag after it already happened turned out to be prohibitively difficult.

Instead, the ELN SIG recognized that the Fedora Rawhide packagers had already done the hardest part. Instead of trying to replicate their work in an overly-complicated manner, instead the tool would just take advantage of the existing builds. Now, prior to triggering a build for ELN, the tool would first tag the current Rawhide builds into ELN and wait for them to be added to the Koji buildroot. This solved about 90% of the problems in a generic manner without engineering an excessively complicated side-tag approach. Naturally, it wasn’t a perfect solution, but it got a lot further. (See below for “Why are some package not tagged into the batch side-tag?” for more details.

The most recent modification to this strategy came about as CentOS Stream 10 started to come into the picture. With the intent to bootstrap CS 10 initially from ELN, tagging Rawhide packages to the ELN tag suddenly became a problem, as CS 10 needs to use that tag event as its trigger. The solution here was not to tag Rawhide builds into Fedora ELN directly, but instead to create a new ELN side-tag target where we could tag them, build the ELN packages there and then tag the successful builds into ELN. As a result, CS 10 builds are only triggered on ELN successes.

Frequently Asked Questions

Why does it sometimes take a long time for my package to be rebuilt?

Not all batches are created equal. Sometimes, there will be an ongoing batch with one or more packages whose build takes a very long time to complete. (e.g. gcc, firefox, chromium). This can lead to up to a day’s lag in even getting enqueued. Even if your package was part of the same batch, it will still wait for all packages in the batch to complete before the tag occurs.

Why do batches not run in parallel?

Simply put, until the previous batch is complete, there’s no way to know if a further batch relies on one or more changes from the previous batch. This is a problem we’re hoping might have a solution down the line, if it becomes possible to create “nested” side-tags (side-tags derived from another side-tag instead of a base tag). Today however, serialization is the only safe approach.

Why are some packages not tagged into the batch side-tag?

Some packages have known incompatibilities, such as libllvm and OCAML. The libraries produced in the ELN build and Rawhide build are API or ABI incompatible and therefore cannot be tagged in safely. We have to rely on the previous ELN version of the build in the buildroot.

Why do you not tag successes back into ELN immediately?

Not all ELN packages are built by the auto-rebuilder. Several are maintained individually for various reasons (the kernel, ceph, crypto-policies, etc.). We don’t want to tag a partial batch in out of concern that this could break these other builds.

  1. Technically, the repository is called DistroBuildSync because originally it was meant to serve multiple purposes of rebuilding ELN from Rawhide and also syncing builds for CentOS Stream and RHEL. However, the latter two ended up forking off very significantly, so we renamed ours to ELNBuildSync to reduce confusion between them. It unfortunately retains the old name for the repo at the moment due to deployment-related reasons. ↩︎

Sausage Factory: Modules – Fake it till you make it

Module Masquerade

Last week during Flock to Fedora, we had a discussion about what is needed to build a module outside of the Fedora infrastructure (such as through COPR or OBS). I had some thoughts on this and so I decided to perform a few experiments to see if I could write up a set of instructions for building standalone modules.

To be clear, the following is not a supported way to build modules, but it does work and covers most of the bases.

Step 1: Creating module-compatible RPMs

RPMs built as part of a module within Fedora’s Module Build Service are slightly different than RPMs built traditionally. In MBS, all RPMs built have an extra header injected into them: ModularityLabel. This header contains information about what module the RPM belongs to and is intended to help DNF avoid situations where an update transaction would attempt to replace a modular RPM with a non-modular one (due to a transient unavailability of the module metadata). This step may not be absolutely necessary in many cases. If you are trying to create a module from RPMs that you didn’t build, you can probably get away with skipping this step, provided that you don’t care if there might be unpredictable behavior if you encounter a broken repo mirror.

To create a module-compatible RPM, add the following line to your spec file for each binary RPM you are producing:

ModularityLabel: <arbitrary string>

Other than that new RPM label, you don’t need to do anything else. Just build your RPMs and then create a yum repository using the createrepo_c tool. The ModularityLabel can be any string at all. In Fedora, we have a convention to use name:stream:version:context to indicate from which build the RPM originally came from, but this is not to be relied upon. It may change at any time and it also may not be accurately reflective of the module in which it currently resides, due to component-reuse in the Module Build System.

Step 2: Converting the repo into a module

Now comes the complicated part: we need to construct the module metadata that matches the content you want in your module and then inject it into the yum repo you created above. This means that we need to generate the appropriate module metadata YAML for this repository first.

Fortunately, for this simple approach, we really only need to focus on a few bits of the module metadata specification. First, of course, we need to specify all of the required attributes: name, stream, version, context, summary, description and licenses. Then we need to look at what we want need for the artifacts, profiles and api sections.

Artifacts are fairly straightforward: you need to include the NEVRA of every package in the repository that you want to be exposed as part of the module stream. The NEVRA format is of the form examplepackage-0:0.1-5.x86_64.

Once the artifacts are all listed, you can decide if you want to create one or more profiles and if you want to identify the public API of the module.

It is always recommended to check your work with the modulemd-validator binary included in the libmodulemd package. It will let you know if you have missed anything that will break the format.

Shortcut

While drafting this walkthrough, I ended up writing a fairly simple python3 tool called repo2module. You can run this tool against a repository created as in Step 1 and it will output most of what you need for module metadata. It defaults to including everything in the api section and also creating a default profile called everything that includes all of the RPMs in the module.

Step 3: Injecting the module metadata into the repository

Once the module metadata is ready for inclusion, it can be copied into the repository from Step 1 using the following command:

modifyrepo_c --mdtype=modules modules.yaml /path/to/repodata

With that done, add your repository to your DNF/Yum configuration (or merge it into a bigger repository with mergerepo_c, provided you have version 0.13.2 or later) and run dnf module list and you should see your new module there!


Edit 2019-08-16: Modified the section on ModularityLabel to recognize that there is no defined syntax and that any string may be used.

Flock 2019 Trip Report

Just flew back from Flock to Fedora in Budapest, Hungary and boy are my arms tired! As always, it was an excellent meeting of the minds in Fedora. I even had the opportunity to meet my Outreachy intern, Niharika Shrivastava!

Day One – Thursday

As usual, the conference began with Matthew Miller’s traditional “State of Fedora” address wherein he uses pretty graphs to confound and amaze us. Oh, and reminds us that we’ve come a long way in Fedora and we have much further to go together, still.

Next was a keynote by Cate Huston of Automattic (now the proud owners of both WordPress and Tumblr, apparently!). She talked to us about the importance of understanding when a team has become dysfunctional and some techniques for getting back on track.

After lunch, Adam Samalik gave his talk, “Modularity: to modularize or not to modularize?”, describing for the audience some of the cases where Fedora Modularity makes sense… and some cases where other packaging techniques are a better choice. This was one of the more useful sessions for me. Once Adam gave his prepared talk, the two of us took a series of great questions from the audience. I hope that we did a good job of disambiguating some things, but time will tell how that works out. We also got some suggestions for improvements we could make, which were translated into Modularity Team tickets: here and here.

Next, Merlin Mathesius, our official Modularity Wizard, gave his talk on “Tools for Making Modules in Fedora”, focusing on various resources that he and others have created for simplifying the module packaging process.

Next, I rushed off to my annual “State of the Fedora Server” talk. This was a difficult one for me. Fedora Server has, for some time now, been operating as a largely one-man (me) effort of just making sure that the installation media continues to function properly. It has seen very little innovation and is failing in its primary mission: to provide a development ground for the next generation of open-source servers. I gave what amounted to an obituary speech and then opened the floor to discussion. The majority of the discussion came down to this: projects can only survive if people want to work on them and there really isn’t a clear idea of what that would be in the server space. Fedora Server is going to need to adapt or dissipate. More on that in a future update.

Later that afternoon, I attended Brendan Conoboy’s talk “Just in Time Transformation” where he discussed the internal process changes that Red Hat went through in order to take Fedora and deliver Red Hat Enterprise Linux 8. Little of this was new to me, naturally, having lived through it (with scars to show), but it was interesting to hear how the non-Red Hat attendees perceived it.

For the last event of the first day, we had a round of Slideshow Karaoke. This was a lot of fun and quite hilarious. It was a great way to round out the start of Flock.

Day Two – Friday

The second day of Flock opened with Denise Dumas, VP of Platform Engineering at Red Hat, giving a talk about “Fedora, Red Hat and IBM”. Specifically: How will the IBM acquisition affect Fedora? Short answer: it won’t. Best line of this talk: “If you want to go fast, go alone. If you want to go far, go together.”

After that came a lively panel discussion where Denise Dumas, Aleksandra Fedorova, Brendan Conoboy and Paul Frields talked to us about the relationship between Fedora and Red Hat Enterprise Linux 8, particularly where it diverged and a little of what is coming next for that relationship.

After lunch, I attended Pierre-Yves Chibon’s talk on Gating rawhide packages. Now that it’s live and in production, there was a very high interest; many were unable to find seats and stood around the walls. There was a short lecture describing the plans to get more tests and support for multi-package gating.

Next up, I attended Alexander Bokovoy’s talk on the “State of Authentication and Identity Management in Fedora”. Alexander discussed a lot of deep technical topics, including the removal of old, insecure protocols from Fedora and the status of authentication tools like SSSD and Kerberos in the distribution.

I went to yet another of Brendan Conoboy’s talks after that, this time on “What Stability Means and How to Do Better”. The focus on this talk was that “stability” means many different things to different people. Engineers tend to focus on stabliity meaning “it doesn’t crash”, but stability can mean everything from that through “backwards-compatibility of ABIs” and all the way through to “the user experience remains consistent”. This was quite informative and I think the attendees got a lot out of it. I did.

The next talk I attended was given by Niharika Shrivastava (my aforementioned Outreachy intern) and Manas Mangaonkar on “Students in developing nations and FOSS contribution limitation”. It provided a very interesting (and, at times, disturbing) perspective on how open-source contribution is neglected and even dismissed by many Indian universities and businesses. Clearly we (the FOSS community) need to expend more resources in this area.

Friday concluded with a river cruise along the Danube, which was a nice chance to unwind and hobnob with my fellow Fedorans. I got a few pictures, chatted with some folks I hadn’t seen in a long time as well as got introduced to several new faces (always wonderful to see!).

Day Three – Saturday

By the time Saturday rolled around, jet-lag was catching up to me, as well as some very long days, so I was somewhat tired and zombie-like. I’ve been told that I participated in a panel during the “Fedora Summer Coding 2019 Project Showcase and Meetup”, but I have few memories of the event. Kidding aside, it was a wonderful experience. Each of the interns from Google Summer of Code, Google Code-In and Outreachy gave a short presentation of the work they had been doing over the summer. I was extremely proud of my intern, Niharika, who gave an excellent overview of the translation work that she’s been working on for the last two months. The other projects were exciting as well and I look forward to their completion. The panel went quite well and we got some excellent questions. All in all, this year was one of my most positive experiences with internships and I hope very much that it’s setting the stage for the future as well.

After lunch came the headsman… I mean the “Modularity & Packager Experience Birds-Of-A-Feather” session. We started the session by spending fifteen minutes to list all of our gripes with the current state of Modularity packaging. These were captured on a poster board and later by Langdon White into a Google Doc. We then voted, unconference-style, on the issues that people most wanted to see addressed. The top four subjects were selected and we allocated a quarter of the remaining session time for each of them.

I personally missed the first topic as I ended up in a sidebar discussing internationalization plans with one of our Fedora Translation Team members, who had been following the work that Niharika and I have been doing in that space.

The other topics that were discussed at length involved how to perform offline local module builds, creating documentation and tooling to enable non-MBS services like COPR and OBS to create modules and how to deal with rolling defaults and rolling dependencies. Langdon White took additional notes and is, I believe, planning to present a report on it as well, which I will link to once it becomes available.

This was unquestionably the most useful session at Flock for me. We were able, in a fairly short period of time, to enumerate the problems before us and work together to come up with some concrete steps for addressing them. If this had been the only session I attended at Flock, it would still have been worth the price of travel.

Day Four – Sunday

Due to a slight SNAFU scheduling my return flight,  I had to leave at 11:00 in the morning to catch my plane. I did, however, spend a while in the morning playing around with some ideas on how to offer simple module creation to OBS and COPR. I think I made some decent progress, which I’ll follow up on in a future blog post.

Conclusion

As always, Flock to Fedora was an excellent conference. As every year, I find that it revitalizes me and inspires me to get back to work and make reality out of the ideas we brainstormed there. It’s going to be an interesting year!

Sausage Factory: Advanced module building in Fedora

First off, let me be very clear up-front: normally, I write my blog articles to be approachable by readers of varying levels of technical background (or none at all). This will not be one of those. This will be a deep dive into the very bowels of the sausage factory.

This blog post is a continuation of the Introduction to building modules in Fedora entry I wrote last month. It will assume a familiarity with all of the concepts discussed there.

Analyzing a more complicated module

Last time, we picked an extremely simple package to create. The talloc module needed to contain only a single RPM, since all the dependencies necessary both at build-time and runtime were available from the existing base-runtime, shared-userspace and common-build-dependencies packages.

This time, we will pick a slightly more complicated example that will require exploring some of the concepts around building with package dependencies. For this purpose, I am selecting the sscg package (one of my own and discussed previously on this blog in the article “Self-Signed SSL/TLS Certificates: Why they are terrible and a better alternative“).

We will start by analyzing sscg‘s dependencies. As you probably recall from the earlier post, we can do this with dnf repoquery:

dnf repoquery --requires sscg.x86_64 --resolve

Which returns with:

glibc-0:2.25-6.fc26.i686
glibc-0:2.25-6.fc26.x86_64
libpath_utils-0:0.2.1-30.fc26.x86_64
libtalloc-0:2.1.9-1.fc26.x86_64
openssl-libs-1:1.1.0f-4.fc26.x86_64
popt-0:1.16-8.fc26.x86_64

and then also get the build-time dependencies with:

dnf repoquery --requires --enablerepo=fedora-source --enablerepo=updates-source sscg.src --resolve

Which returns with:/home/sgallagh/modulebuild/builds/module-talloc-master-20170526153440/results/module-build-macros-mock-stderr.log

gcc-0:7.1.1-3.fc26.i686
gcc-0:7.1.1-3.fc26.x86_64
libpath_utils-devel-0:0.2.1-30.fc26.i686
libpath_utils-devel-0:0.2.1-30.fc26.x86_64
libtalloc-devel-0:2.1.9-1.fc26.i686
libtalloc-devel-0:2.1.9-1.fc26.x86_64
openssl-devel-1:1.1.0f-4.fc26.i686
openssl-devel-1:1.1.0f-4.fc26.x86_64
popt-devel-0:1.16-8.fc26.i686
popt-devel-0:1.16-8.fc26.x86_64

So let’s start by narrowing down the set of dependencies we already have by comparing them to the three foundational modules. The base-runtime module provides gcc, glibcopenssl-libs, openssl-devel, popt, and popt-devel . The shared-userspace module provides libpath_utils and libpath_utils-devel as well, which leaves us with only libtalloc as an unsatisfied dependency. Wow, what a convenient and totally unexpected outcome when I chose this package at random! Kidding aside, in most real-world situations this would be the point at which we would start recursively going through the leftover packages and seeing what their dependencies are. In this particular case, we know from the previous article that libtalloc is self-contained, so we will only need to include sscg and libtalloc in the module.

As with the libtalloc example, we need to now clone the dist-git repositories of both packages and determine the git hash that we intend to use for building the sscg module. See the previous blog post for details on this.

Creating a module with internal dependencies

Now let’s set up our git repository for our new module:

mkdir sscg && cd sscg
touch sscg.yaml
git init
git add sscg.yaml
git commit -m "Initial setup of the module"

And then we’ll edit the sscg.yaml the same way we did for the libtalloc module:

document: modulemd
version: 1
data:
  summary: Simple SSL certificate generator
  description: A utility to aid in the creation of more secure "self-signed" certificates. The certificates created by this tool are generated in a way so as to create a CA certificate that can be safely imported into a client machine to trust the service certificate without needing to set up a full PKI environment and without exposing the machine to a risk of false signatures from the service certificate.
  stream: ''
  version: 0
  license:
    module:
    - GPLv3+
  references:
    community: https://github.com/sgallagher/sscg
    documentation: https://github.com/sgallagher/sscg/blob/master/README.md
    tracker: https://github.com/sgallagher/sscg/issues
  dependencies:
    buildrequires:
      base-runtime: f26
      shared-userspace: f26
      common-build-dependencies: f26
      perl: f26
    requires:
      base-runtime: f26
      shared-userspace: f26
  api:
    rpms:
    - sscg
  profiles:
    default:
    - sscg
  components:
    rpms:
      libtalloc:
        rationale: Provides a hierarchical memory allocator with destructors. Dependency of sscg.
        ref: f284a27d9aad2c16ba357aaebfd127e4f47e3eff
        buildorder: 0
      sscg:
        rationale: Purpose of this module. Provides certificate generation helpers.
        ref: d09681020cf3fd33caea33fef5a8139ec5515f7b
        buildorder: 1

There are several changes from the libtalloc example in this modulemd, so let’s go through them one at a time.

The first you may notice is the addition of perl in the buildrequires: dependencies. This is actually a workaround at the moment for a bug in the module-build-service where not all of the runtime requirements of the modules specified as buildrequires: are properly installed into the buildroot. It’s unfortunate, but it should be fixed in the near future and I will try to remember to update this blog post when it happens.

You may also notice that the api section only includes sscg and not the packages from the libtalloc component. This is intentional. For the purposes of this module, libtalloc satisfies some dependencies for sscg, but as the module owner I do not want to treat libtalloc as a feature of this module (and by extension, support its use for anything other than the portions of the library used by sscg). It remains possible for consumers of the module to link against it and use it for their own purposes, but they are doing so without any guarantee that the interfaces will remain stable or even be present on the next release of the module.

Next on the list is the addition of the entirely-new profiles section. Profiles are a way to indicate to the package manager (DNF) that some packages from this module should automatically be installed when the module is activated if a certain system profile is enabled. The ‘default’ profile will take effect if no other profile is explicitly set. So in this case, the expectation if a user did dnf module install sscg would be to activate this module and install the sscg package (along with its runtime dependencies) immediately.

Lastly, under the RPM components there is a new option, buildorder. This is used to inform the MBS that some packages are dependent upon others in the module when building. In our case, we need libtalloc to be built and added into the buildroot before we can build sscg or else the build will fail and we will be sad. By adding buildorder, we tell the MBS: it’s okay to build any of the packages with the same buildorder value concurrently, but we should not attempt to build anything with a higher buildorder value until all of those lower have completed. Once all packages in a buildorder level are complete, the MBS will generate a private buildroot repository for the next buildorder to use which includes these packages. If the buildorder value is left out of the modulemd file, it is treated as being buildorder: 0.

At this point, you should be able to go ahead and commit this modulemd file to git and run mbs-build local successfully. Enjoy!

Sausage Factory: An introduction to building modules in Fedora

First off, let me be very clear up-front: normally, I write my blog articles to be approachable by readers of varying levels of technical background (or none at all). This will not be one of those. This will be a deep dive into the very bowels of the sausage factory.

This blog post assumes that the reader is aware of the Fedora Modularity Initiative and would like to learn how to build their very own modules for inclusion into the Fedora Project. I will guide you through the creation of a simple module built from existing Fedora Project packages on the “F26” branch.

To follow along, you will need a good working knowledge of the git source-control system (in particular, Fedora’s “dist-git“) as well as being generally comfortable around Fedora system tools such as dnf and python.

Setting up the Module Build Service

For the purposes of this blog, I am going to use Fedora 25 (the most recent stable release of Fedora) as the host platform for this demonstration and Fedora 26 (the current in-development release) as the target. To follow along, please install Fedora 25 Server on a bare-metal or virtual machine with at least four processors and 8 GiB of RAM.

First, make sure that the system is completely up-to-date with all of the latest packages. Then we will install the “module-build-service” package. We will need version 1.3.24 or later of the module-build-service RPM and version 1.2.0 or later of python2-modulemd, which at the time of this writing requires installing from the “updates-testing” repository. (EDIT 2017-06-30: version 1.3.24 requires the mock-scm package for local builds but doesn’t have a dependency on it.)

dnf install --enablerepo=updates-testing module-build-service python2-modulemd mock-scm

This may install a considerable number of dependency packages as well. Once this is installed, I recommend modifying /etc/module-build-service/config.py to change NUM_CONCURRENT_BUILDS to match the number of available processors on the system.

Leave the rest of the options alone at this time. The default configuration will interact with the production Fedora Project build-systems and is exactly what we want for the rest of this tutorial.

In order to perform builds locally on your machine, your local user will need to be a member of the mock group on the system. To do this, run the following command:

usermod -a -G mock <yourloginname>

Then you will need to log out of the system and back in for this to take effect (since Linux only adds group memberships at login time).

Gathering the module dependencies

So now that we have a build environment, we need something to build. For demonstration purposes, I’m going to build a module to provide the libtalloc library used by the Samba and SSSD projects. This is obviously a trivial example and would never become a full module on its own.

The first thing we need to do is figure out what runtime and build-time dependencies this package has. We can use dnf repoquery to accomplish this, starting with the runtime dependencies:

dnf repoquery --requires libtalloc.x86_64 --resolve

Which returns with:

glibc-0:2.25-4.fc26.i686
glibc-0:2.25-4.fc26.x86_64
libcrypt-0:2.25-4.fc26.x86_64
libcrypt-nss-0:2.25-4.fc26.x86_64

There are two libcrypt implementations that will satisfy this dependency, so we can pick one a little later. For glibc, we only want the one that will operate on the primary architecture, so we’ll ignore the .i686 version.

Next we need to get the build-time dependencies with:

dnf repoquery --requires --enablerepo=fedora-source --enablerepo=updates-source libtalloc.src --resolve

Which returns with:

docbook-style-xsl-0:1.79.2-4.fc26.noarch
doxygen-1:1.8.13-5.fc26.x86_64
libxslt-0:1.1.29-1.fc26.i686
libxslt-0:1.1.29-1.fc26.x86_64
python2-devel-0:2.7.13-8.fc26.i686
python2-devel-0:2.7.13-8.fc26.x86_64
python3-devel-0:3.6.1-6.fc26.i686
python3-devel-0:3.6.1-6.fc26.x86_64

OK, that’s not bad. Similar to the runtime dependencies above, we will ignore the .i686 versions. So now we have to find out which of these packages are provided already by the base-runtime module or the shared-userspace module, so we don’t need to rebuild them. Unfortunately, we don’t have a good reference location for getting this data yet (it’s coming a little ways into the future), so for the time being we will need to look directly at the module metadata YAML files:

When reading the YAML, the section that we are interested in is the api->rpms section. This part of the metadata describes the set of packages whose interfaces are public and can be consumed directly by the end-user or other modules. So, looking through these two foundational modules, we see that the base-runtime provides glibc, libcrypt and python3-devel and shared-userspace provides docbook-style-xsl, libxslt​ and python2-devel and common-build-dependencies provides doxygen. So in this case, all of the dependencies are satisfied by these three core modules. If they were not, we’d need to recurse through the dependencies and figure out what additional packages we would need to include in our module to support libtalloc or see if there was another module in the collection that provided it.

So, the next thing we’re going to need to do is decide which version of libtalloc we want to package. What we want to do here is check out the libtalloc module from Fedora dist-git and then find a git commit has that matches the build we want to add to our module. We can check out the libtalloc module by doing:

fedpkg clone --anonymous rpms/libtalloc && cd libtalloc

Once we’re in this git checkout, we can use the git log command to find the commit hash that we want to include. For example:

[sgallagh@sgallagh540:libtalloc (master)]$ git log -1
commit f284a27d9aad2c16ba357aaebfd127e4f47e3eff (HEAD -> master, origin/master, origin/f26, origin/HEAD)
Author: Lukas Slebodnik <lslebodn@redhat.com>
Date: Tue Feb 28 09:03:05 2017 +0100

New upstream release - 2.1.9
 
 rhbz#1401225 - Rename python packages to match packaging guidelines
 https://fedoraproject.org/wiki/Changes/Automatic_Provides_for_Python_RPM_Packages

The string of hexadecimal characters following the word “commit” is the git commit hash. Save it somewhere, we’re going to need it in the next section.

Creating a new module

The first thing to be aware of is that the module build-service has certain constraints. The build can only be executed from a directory that has the same name as the module and will look for a file named modulename.yaml in that directory. So in our case, I’m going to name the module talloc, which means I must create a directory called talloc and a module metadata file called talloc.yaml. Additionally, the module-build-service will only work within a git checkout, so we will initialize this directory with a blank metadata file.

mkdir talloc && cd talloc
touch talloc.yaml
git init
git add talloc.yaml
git commit -m "Initial setup of the module"

Now we need to edit the module metadata file talloc.yml and define the contents of the module. A module metadata file’s basic structure looks like this:

document: modulemd
version: 1
data:
  summary: Short description of this module
  description: Full description of this module
  license:
    module:
    - LICENSENAME
  references:
    community: Website for the community that supports this module
    documentation: Documentation website for this module
    tracker: Issue-tracker website for this module
  dependencies:
    buildrequires:
      base-runtime: f26
      shared-userspace: f26
      common-build-dependencies: f26
    requires:
      base-runtime: f26
      shared-userspace: f26
  api:
    rpms:
    - rpm1
    - ...
  filter:
    rpms:
    - filteredrpm1
    - ...
  components:
    rpms:
      rpm1:
        rationale: reason to include rpm1
        ref:

Let’s break this down a bit. First, the document type and version are fixed values. These determine the version of the metadata format. Next comes the “data” section, which contains all the information about this module.

The summary, description and references are described in the sample. The license field should describe the license of the module, not its contents which carry their own licenses.

The apisection is a list of binary RPMs that are built from the source RPMs in this module whose presence you want to treat as “public”. In other words, these are the RPMs in this module that others can expect to be available for their use. Other RPMs may exist in the repository (to satisfy dependencies or simply because they were built as a side-effect of generating these RPMs that you need), but these are the ones that consumers should use.

On the flip side of that, we have the filter section. This is a place to list binary RPM packages that explicitly must not appear in the final module so that no user will try to consume them. The main reason to use this would be if a package builds a subpackage that is not useful to the intended audience and requires additional dependencies which are not packaged in the module. (For example, a module might contain a package that provides a plugin for another package and we don’t want to ship that other package just for this reason).

Each of the components describes a source RPM that will be built as part of this module. The rationale is a helpful comment to explain why it is needed in this module. The ref field describes any reference in the dist-git repository that can be used to acquire these sources. It is recommended to use an exact git commit here so that the results are always repeatable, but you can also use tag or branch names.

So our talloc module should look like this:

document: modulemd
version: 1
data:
  summary: The talloc library
  description: A library that implements a hierarchical allocator with destructors.
  stream: ''
  version: 0
  license:
    module:
    - LGPLv3+
  references:
    community: https://talloc.samba.org/
    documentation: https://talloc.samba.org/talloc/doc/html/libtalloc__tutorial.html
    tracker: http://bugzilla.samba.org/
  dependencies:
    buildrequires:
      base-runtime: f26
      shared-userspace: f26
      common-build-dependencies: f26
    requires:
      base-runtime: f26
  api:
    rpms:
    - libtalloc
    - libtalloc-devel
    - python-talloc
    - python-talloc-devel
    - python3-talloc
    - python3-talloc-devel
  components:
    rpms:
      libtalloc:
        rationale: Provides a hierarchical memory allocator with destructors
        ref: f284a27d9aad2c16ba357aaebfd127e4f47e3eff

You will notice I omitted the “filter” section because we want to provide all of the subpackages here to our consumers. Additionally, while most modules will require the shared-userspace module at runtime, this particular trivial example does not.

So, now we need to commit these changes to the local git repository so that the module build service will be able to see it.

git commit talloc.yaml -m "Added module metadata"

Now, we can build this module in the module build service. Just run:

mbs-build local

The build will proceed and will provide a considerable amount of output telling you what it is doing (and even more if you set LOG_LEVEL = 'debug' in the /etc/module-build-service/config.py file). The first time it runs, it will take a long time because it will need to download and cache all of the packages from the base-runtime and shared-userspace modules to perform the build. (Note: due to some storage-related issues in the Fedora infrastructure right now, you may see some of the file downloads time out, canceling the build. If you restart it, it will pick up from where it left off and retry those downloads.)

The build will run and deposit results in the ~/modulebuild/builds directory in a subdirectory named after the module and the timestamp of the git commit from which it was built. This will include mock build logs for each individual dependency, which will show you if it succeeded or failed.

When the build completes successfully, the module build service will have created a yum repository in the same results directory as the build logs containing all of the produced RPMs and repodata (after filtering out the undesired subpackages).

And there you have it! Go off and build modules!

Edit 2017-06-30: Switched references from NUM_CONSECUTIVE_BUILDS to NUM_CONCURRENT_BUILDS and updated the minimum MBS requirement to 1.3.24. Added notes about needing to be in the ‘mock’ group.

Edit 2017-09-06: Updated module links to use new Pagure-based dist-git.

I am a Cranky, White, Male Feminist

Today, I was re-reading an linux.com article from 2014 by Leslie Hawthorne which had been reshared by the Linux Foundation Facebook account yesterday in honor of #GirlDay2017 (which I was regrettably unaware of until it was over). It wasn’t so much the specific content of the article that got me thinking, but instead the level of discourse that it “inspired” on the Facebook thread that pointed me there (I will not link to it as it is unpleasant and reflects poorly on The Linux Foundation, an organization which is in most circumstances largely benevolent).

In the article, Hawthorne describes the difficulties that she faced as a woman in getting involved in technology (including being dissuaded by her own family out of fear for her future social interactions). While in her case, she ultimately ended up involved in the open-source community (albeit through a roundabout journey), she explained the sexism that plagued this entire process, both casual and explicit.

What caught my attention (and drew my ire) was the response to this article. This included such thoughtful responses as “Come to my place baby, I’ll show you my computer” as well as completely tone-deaf assertions that if women really wanted to be involved in tech, they’d stick it out.

Seriously, what is wrong with some people? What could possibly compel you to “well, actually” a post about a person’s own personal experience? That part is bad enough, but to turn the conversation into a deeply creepy sexual innuendo is simply disgusting.

Let me be clear about something: I am a grey-haired, cis-gendered male of Eastern European descent. As Patrick Stewart famously said:

patrickstewart

I am also the parent of two young girls, one of whom is celebrating her sixth birthday today. The fact of the timing is part of what has set me off. You see, this daughter of mine is deeply interested in technology and has been since a very early age. She’s a huge fan of Star Wars, LEGOs and point-and-click adventure games. She is going to have a very different experience from Ms. Hawthorne’s growing up, because her family is far more supportive of her interests in “nerdy” pursuits.

But still I worry. No matter how supportive her family is: Will this world be willing to accept her when she’s ready to join it? How much pressure is the world at large going to put on her to follow “traditional” female roles. (By “traditional” I basically mean the set of things that were decided on in the 1940s and 1950s and suddenly became the whole history of womanhood…)

So let me make my position perfectly clear.  I am a grey-haired, cis-gendered male of Eastern European descent. I am a feminist, an ally and a human-rights advocate. If I see bigotry, sexism, racism, ageism or any other “-ism” that isn’t humanism in my workplace, around town, on social media or in the news, I will take a stand against it, I will fight it in whatever way is in my power and I will do whatever I can to make a place for women (and any other marginalized group) in the technology world.

Also, let me be absolutely clear about something: if I am interviewing two candidates for a job (any job, at my current employer or otherwise) of similar levels of suitability, I will fall on the side of hiring the woman, ethnic minority or non-cis-gendered person over a Caucasian man. No, this is not “reverse racism” or whatever privileged BS you think it is. Simply put: this is a set of people who have had to work at least twice as hard to get to the same point as their privileged Caucasion male counterpart and I am damned sure that I’m going to hire the person with that determination.

As my last point (and I honestly considered not addressing it), I want to call out the ignorant jerks who claim, quote “Computer science isn’t a social process at all, it’s a completely logical process. People interested in comp. sci. will pursue it in spite of people, not because of it. If you value building relationships more than logical systems, then clearly computer science isn’t for you.” When you say this, you are saying that this business should only permit socially-inept males into the club. So let me use some of your “completely logical process” to counter this – and I use the term extremely liberally – argument.

In computer science, we have an expression: “garbage in, garbage out”. What it essentially means is that when you write a function or program that processes data, if you feed it bad data in, you generally get bad (or worthless… or harmful…) data back out. This is however not limited to code. It is true of any complex system, which includes social and corporate culture. If the only input you have into your system design is that of egocentric, anti-social men, then the only things you can ever produce are those things that can be thought of by egocentric, anti-social men. If you want instead to have a unique, innovative idea, then you have to be willing to listen to ideas that do not fit into the narrow worldview that is currently available to you.

Pushing people away and then making assertions that “if people were pushed away so easily, then they didn’t really belong here” is the most deplorable ego-wank I can think of. You’re simultaneously disregarding someone’s potential new idea while helping to remove all of their future contributions from the available pool while at the same time making yourself feel superior because you think you’re “stronger” than they are.

To those who are reading this and might still feel that way, let me remind you of something: chances are, you were bullied as a child (I know I was). There are two kinds of people who come away from that environment. One is the type who remembers what it was like and tries their best to shield others from similar fates. The other is the type that finds a pond where they can be the big fish and then gets their “revenge” by being a bully themselves to someone else.

If you’re one of those “big fish”, let me be clear: I intend to be an osprey.

A sweet metaphor

If you’ve spent any time in the tech world lately, you’ve probably heard about the “Pets vs. Cattle” metaphor for describing system deployments. To recap: the idea is that administrators treat their systems as animals: some they treat very much like a pet; they care for them, monitor them intently and if they get “sick”, nurse them back to help. Other systems are more like livestock: their value to them is in their ready availability and if any individual one gets sick, lamed, etc. you simply euthanize it and then go get a replacement.

Leaving aside the dreadfully inaccurate representation of how ranchers treat their cattle, this metaphor is flawed in a number of other ways. It’s constantly trotted out as being representative of “the new way of doing things vs. the old way”. In reality, I cannot think of a realistic environment that would ever be able to move exclusively to the “new way”, with all of their machines being small, easily-replaceable “cattle”.

No matter how much the user-facing services might be replaced with scalable pods, somewhere behind that will always be one or more databases. While databases may have load-balancers, failover and other high-availability and performance options, ultimately they will always be “pets”. You can’t have an infinite number of them, because the replication storm would destroy you, and you can’t kill them off arbitrarily without risking data loss.

The same is true (perhaps doubly so) for storage servers. While it may be possible to treat the interface layer as “cattle”, there’s no way that you would expect to see the actual storage itself being clobbered and overwritten.

The main problem I have with the traditional metaphor is that it doesn’t demonstrate the compatibility of both modes of operation. Yes, there’s a lot of value to moving your front-end services to the high resilience that virtualization and containerization can provide, but that’s not to say that it can continue to function without the help of those low-level pets as well. It would be nice if every part of the system from bottom to top was perfectly interchangeable, but it’s unlikely to happen.

So, I’d like to propose a different metaphor to describe things (in keeping with the animal husbandry theme): beekeeping. Beehives are (to me) a perfect example of how a modern hybrid-mode system is set up. In each hive you have thousands of completely replaceable workers and drones; they gather nectar and support the hive, but the loss of any one (or even dozens) makes no meaningful difference to the hive’s production.

However, each hive also has a queen bee; one entity responsible for controlling the hive and making sure that it continues to function as a coherent whole. If the queen dies or is otherwise removed from the hive, the entire system collapses on itself. I think this is a perfect metaphor for those low-level services like databases, storage and domain control.

This metaphor better represents how the different approaches need to work together. “Pets” don’t provide any obvious benefit to their owners (save companionship), but in the computing world, those systems are fundamental to keeping things running. And with the beekeeping metaphor, we even have a representative for the collaborative output… and it even rhymes with “money”.

We are (still) not who we are

This article is a reprint. It first appeared on my blog on January 24, 2013. Given the recent high-profile hack of Germany’s defense minister, I decided it was time to run this one again.


In authentication, we generally talk about three “factors” for determining identity. A “factor” is a broad category for establishing that you are who you claim to be. The three types of authentication factor are:

  • Something you know (a password, a PIN, the answer to a “security question”, etc.)
  • Something you have (an ATM card, a smart card, a one-time-password token, etc.)
  • Something you are (your fingerprint, retinal pattern, DNA)

Historically, most people have used the first of these three forms most commonly. Whenever you’ve logged into Facebook, you’re entering something you know: your username and password. If you’ve ever used Google’s two-factor authentication to log in, you probably used a code stored on your smartphone to do so.

One of the less common, but growing, authentication methods are the biometrics. A couple years ago, a major PC manufacturer ran a number of television commercials advertising their laptop models with a fingerprint scanner. The claim was that it was easy and secure to unlock the machine with a swipe of a finger. Similarly, Google introduced a service to unlock an Android smart phone by using facial recognition with the built-in camera.

Pay attention folks, because I’m about to remove the scales from your eyes. Those three factors I listed above? I listed them in decreasing order of security. “But how can that be?” you may ask. “How can my unchangeable physical attributes be less secure than a password? Everyone knows passwords aren’t secure.”

The confusion here is due to subtle but important definitions in the meaning of “security”. Most common passwords these days are considered “insecure” because people tend to use short passwords which by definition have a limited entropy pool (meaning it takes a smaller amount of time to run through all the possible combinations in order to brute-force the password or run through a password dictionary). However, the pure computational complexity of the authentication mechanism is not the only contributor to security.

The second factor above, “something you have” (known as a token), is almost always of significantly higher entropy than anything you would ever use as a password. This is to eliminate the brute-force vulnerability of passwords. But it comes with a significant downside as well: something you have is also something that can be physically removed from you. Where a well-chosen password can only be removed from you by social engineering (tricking you into giving it to an inappropriate recipient), a token might be slipped off your desk while you are at lunch.

Both passwords and tokens have an important side-effect that most people never think about until an intrusion has been caught: remediation. When someone has successfully learned your password or stolen your token, you can call up your helpdesk and immediately ask them to reset the password or disable the cryptographic seed in the token. Your security is now restored and you can choose a new password and have a new token sent to you.

However, this is not the case with a biometric system. By its very nature, it is dependent upon something that you cannot change. Moreover, the nature of its supposed security derives from this very fact. The problem here is that it’s significantly easier to acquire a copy of someone’s fingerprint, retinal scan or even blood for a DNA test than it is to steal a password or token device and in many cases it can even be done without the victim knowing.

Many consumer retinal scanners can be fooled by a simple reasonably-high-resolution photograph of the person’s eye (which is extremely easy to accomplish with today’s cameras). Some of the more expensive models will also require a moving picture, but today’s high-resolution smartphone cameras and displays can defeat many of these mechanisms as well. It’s well-documented that Android’s face-unlock feature can be beaten by a simple photograph.

These are all technological limitations and as such it’s plausible that they can be overcome over time with more sensitive equipment. However, the real problem with biometric security lies with its inability to replace a compromised authentication device. Once someone has a copy of your ten fingerprints, or a drop of your blood from a stolen blood-sugar test or a close-up video of your eye from a scoped video camera, there is no way to change this data out. You can’t ask helpdesk to send you new fingers, an eyeball or DNA. Therefore, I contend that I lied to you above. There is no full third factor for authentication, because, given a sufficient amount of time, any use of biometrics will eventually degenerate into a non-factor.

Given this serious limitation, one should never under any circumstances use biometrics as the sole form of authentication for any purpose whatsoever.

One other thought: have you ever heard the argument that you should never use the same password on multiple websites because if it’s stolen on one, they have access to the others? Well, the same is true of your retina. If someone sticks malware on your cellphone to copy an image of your eye that you were using for “face unlock”, guess what? They can probably use that to get into your lab too.

The moral of the story is this: biometrics are minimally useful, since they are only viable until the first exposure across all sites where they are used. As a result, if you are considering initiating a biometric-based security model, I encourage you to save your money (those scanners are expensive!) and look into a two-factor solution involving passwords and a token of some kind.